
Set up the NEXT ENGINE integration
Published:2026-11-16 14:28/Updated:2026-11-18 11:12
Once you have a SHOPLINE connection and a NEXT ENGINE connection, complete the auto-sync initial setup. The flow has the same 4 steps as LOGILESS and CROSS MALL (Initial setup for auto-sync). This page focuses on what is different for NEXT ENGINE.
| Step | Heading | What to check for NEXT ENGINE |
|---|---|---|
| 1 | Link configuration | Choose the NEXT ENGINE shop that receives orders |
| 2 | Link integrity | Do SHOPLINE SKUs match NEXT ENGINE product codes? Delivery and payment mapping (optional) |
| 3 | Pre-checks | Can Connex communicate with NEXT ENGINE? |
| 4 | Activation | Complete Check orders (shop check, stopping the previous integration, how to handle pre-activation orders), then activate |
Where to start
Open [Order & Inventory Auto Sync] from [Tools] in the left menu.
Step 1: Link configuration
- In [SHOPLINE connection], choose the SHOPLINE connection to sync. In [Inventory Location], choose the location that receives NEXT ENGINE inventory.
- In [Linked system], choose your NEXT ENGINE connection.
- In [Connection item], choose the NEXT ENGINE shop that receives SHOPLINE orders.
- In [NEXT ENGINE warehouse], choose the location to read inventory from (if there is only one, it is already selected). It cannot be changed after the initial setup.
- Click [Next].
Warning
If you choose the wrong shop, all future orders are registered in another shop. Choose the shop created for SHOPLINE. In step 4, Check orders verifies whether orders in the selected shop match your SHOPLINE orders.
Match the tax setting
Before activating, make the SHOPLINE setting "すべての価格を税込に設定する" and "税区分" in NEXT ENGINE [設定]→[店舗設定] match (On = 税込, Off = 税抜). If they do not match, orders are not sent and stay "Waiting" (When the tax settings do not match).
Step 2: Link integrity
Products
Connex treats a SHOPLINE product and a NEXT ENGINE product as the same item when the SHOPLINE SKU equals the NEXT ENGINE product code (商品コード). Click [Open] on the Products card to go to the [Product sync] tab, where you can check:
- SKU not set: Orders containing a product without a SKU are not sent to NEXT ENGINE. Click the product name and set a SKU in SHOPLINE.
- Only in SHOPLINE: NEXT ENGINE has no product with the same product code. Register the product in NEXT ENGINE, or click [Exclude from linking] for products whose inventory you do not link.
- Only in NEXT ENGINE: Products that exist only in NEXT ENGINE. If you do not sell them on SHOPLINE, you can leave them as they are.
Delivery and payment methods (optional)
Map SHOPLINE delivery plans and payment methods to NEXT ENGINE delivery categories and payment categories. Use [Set up here] on the "Order link settings" row, or the [Link Settings] tab in Connections.
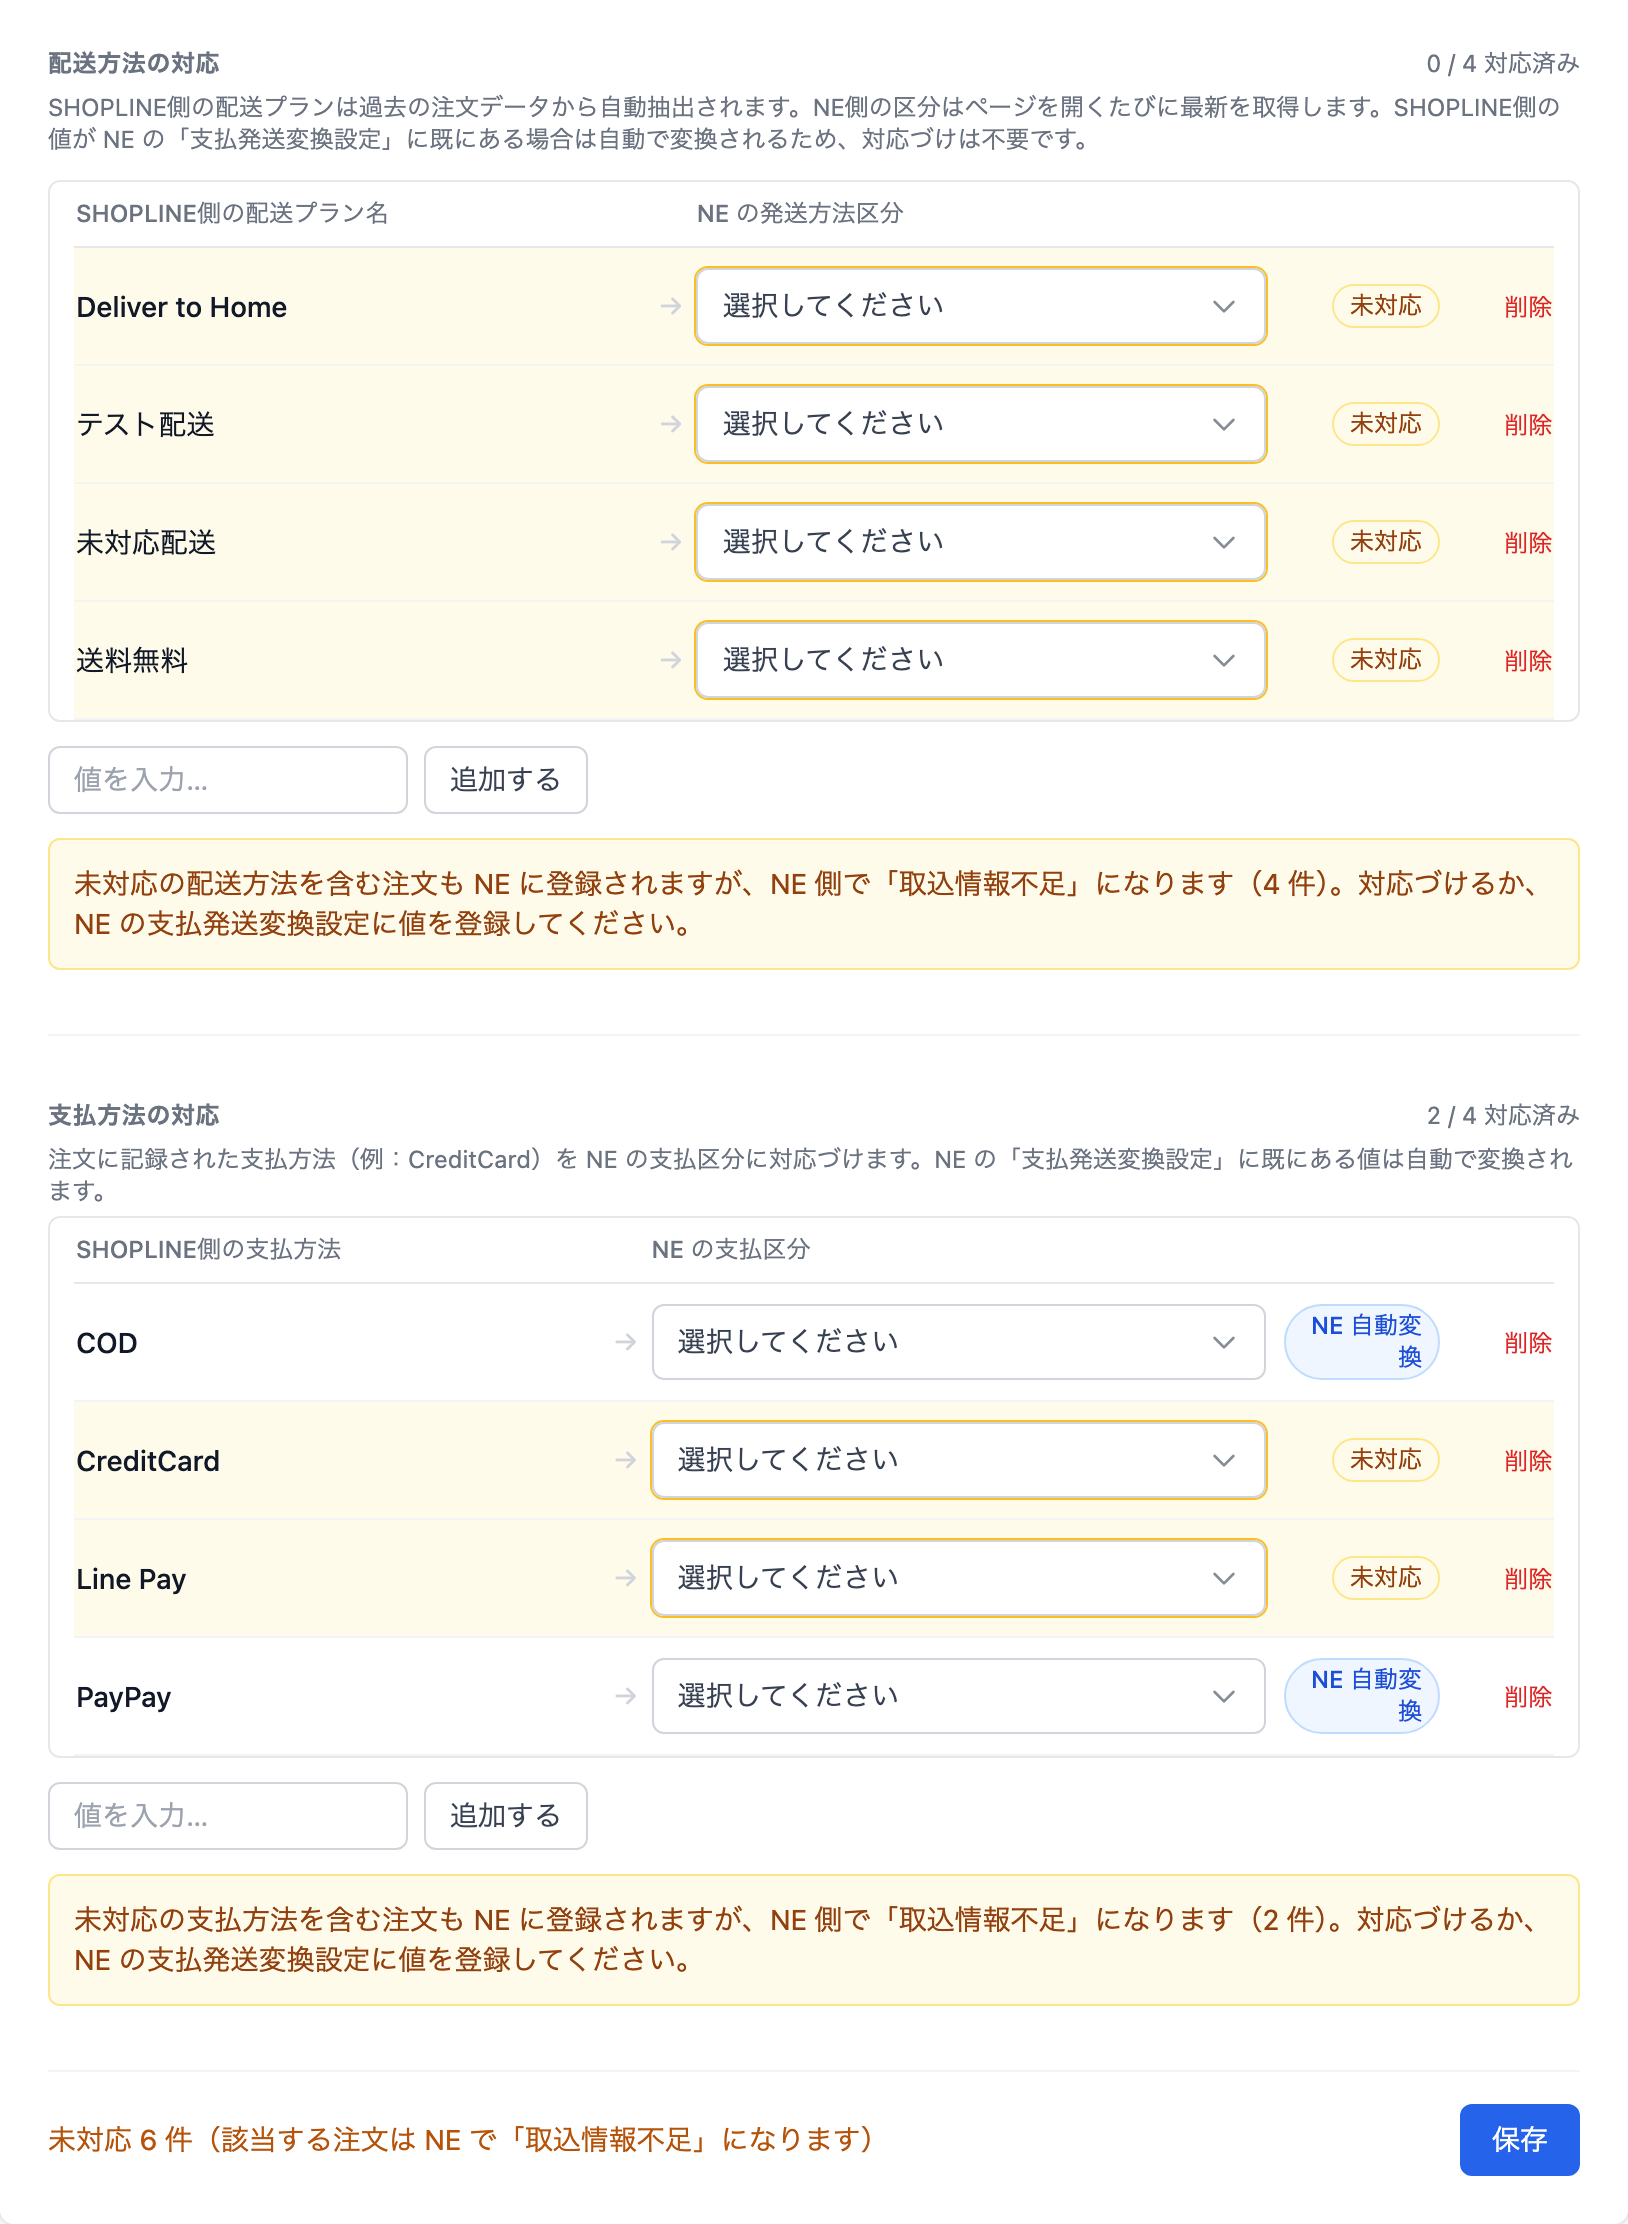
- Values already registered in NEXT ENGINE under [設定]→[受注]→[支払発送変換設定] (payment/delivery conversion settings) are converted automatically (the screen shows "Auto (NE)"). You do not need to map them in Connex.
- Orders containing a value that is neither mapped nor converted are still registered in NEXT ENGINE, but they stop as "取込情報不足" (insufficient import data) in NEXT ENGINE and cannot be processed further.
- Mappings are saved per NEXT ENGINE shop.
When you are done, click [Refresh now] to update the counts, then click [Next].
Step 3: Pre-checks
Click [Run check] to confirm that Connex can communicate with NEXT ENGINE. The result is shown as "API: {status}". If it fails, see Check the connection status.
Step 4: Activation — Check orders
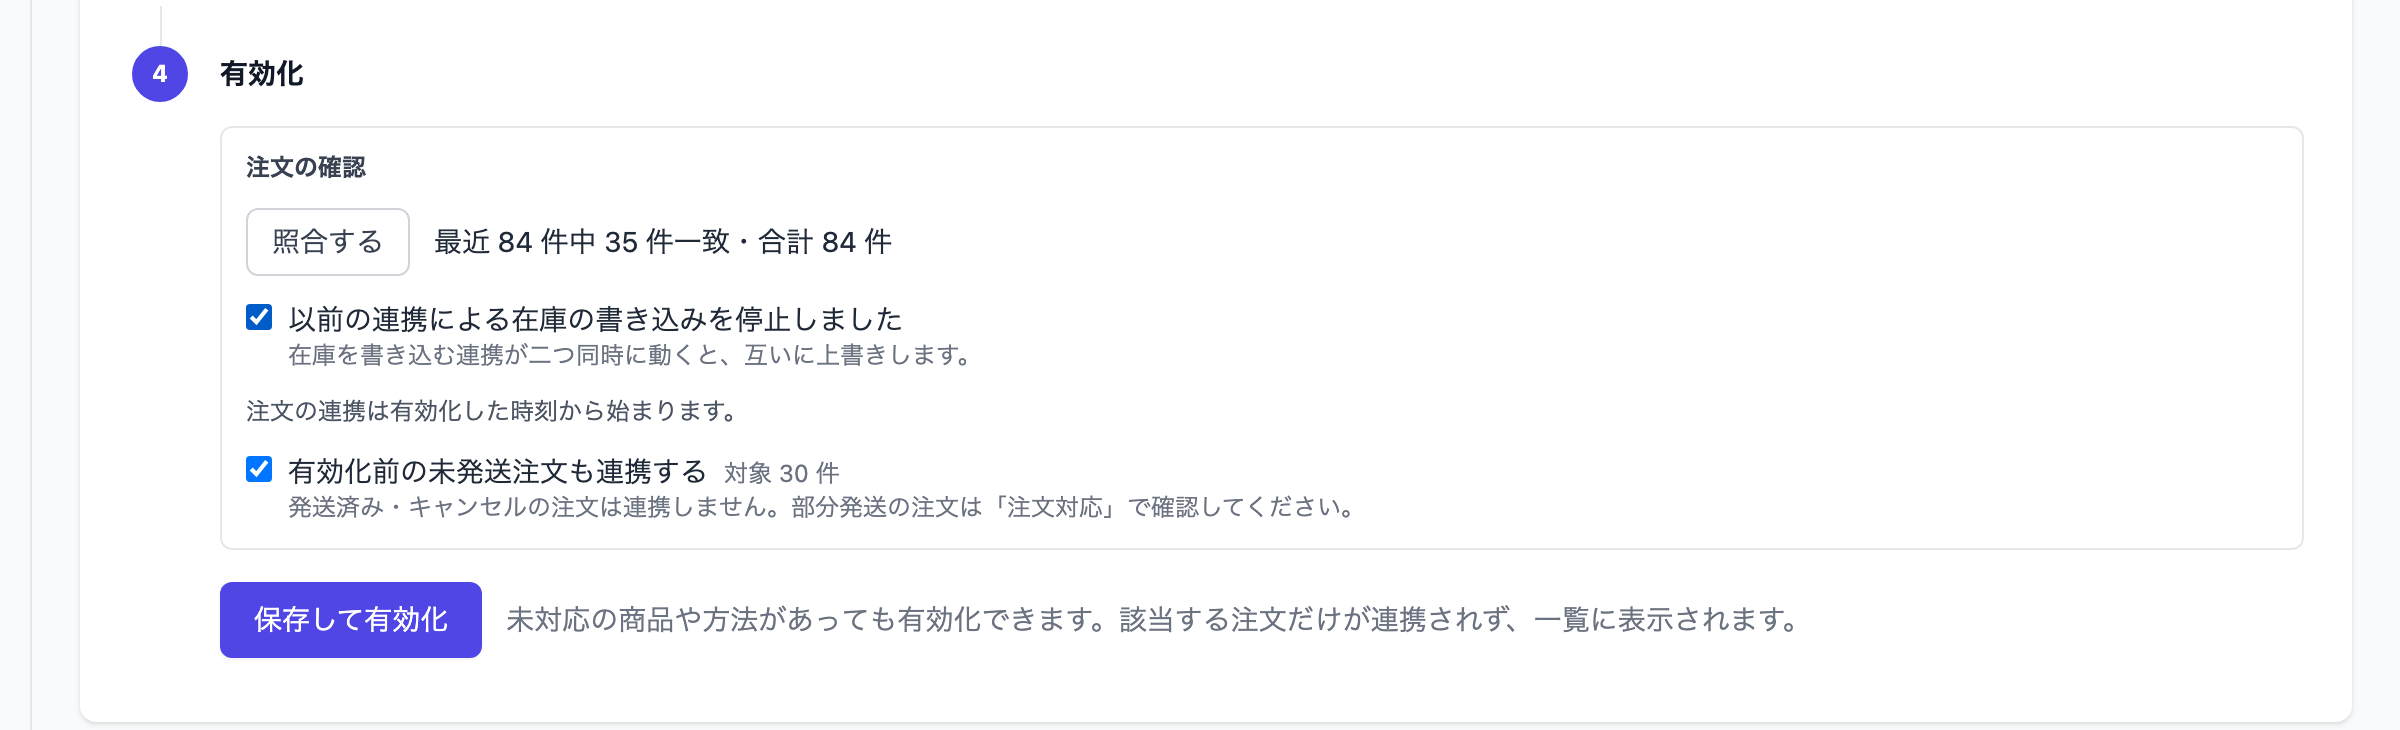
For NEXT ENGINE, you complete Check orders before activation. [Save & Enable] becomes available once all three items are done.
- Shop check: Click [Save settings and check] (your settings are saved, but nothing is activated yet). The result is shown as "{M} of the latest {N} match · {K} total".
- If nothing matches, "None of the orders in the selected shop match your SHOPLINE orders" is shown. Check that the shop is correct; if not, click [Change connection] and choose again. If it is a newly created shop with no orders yet, click [It is a new shop, continue].
- If "This NEXT ENGINE shop has no orders yet (new shop)" is shown, you can continue.
- Stop the previous integration: Check [I have stopped inventory writes from the previous integration]. If two integrations write inventory at the same time, they overwrite each other. Even if you do not use another integration service, confirm and check it.
- Pre-activation orders: [Also send unshipped orders from before activation] is on by default, with the number of target orders next to it.
- Leave it on: unshipped orders from before activation that are not yet in NEXT ENGINE are sent automatically. Shipped or cancelled orders are not sent. Partially shipped orders are not sent; you are asked to review them in the [Orders] tab.
- Turn it off: pre-activation orders are not sent automatically. Send them or mark them as not sent in the Orders tab.
"Order sync starts from the moment you activate." — orders placed after activation are registered in NEXT ENGINE immediately.
After activation
After activation, Connex does the following in the background. It continues even if you close the screen.
- It fetches NEXT ENGINE orders and SHOPLINE orders and matches them. Orders already in NEXT ENGINE are treated as registered and are never sent again.
- (If the option is on) It sends unshipped pre-activation orders that are not in NEXT ENGINE.
- Inventory sync starts only after matching completes. Until then, [Overview] shows "Inventory sync starts after matching completes" with the progress.
You can review the matching results in the [Orders] tab. For daily operations, see Daily operations with NEXT ENGINE.
Warning
After activation, you cannot change the connections, inventory location, or shop. To change them, delete the settings with [Reset Configuration] in the [Settings] tab and run the initial setup again (About reset).
Was this article helpful?